By Justin Dean and Brian Belak
One of our missions for the Woman Behind the Camera project is to digitize and make accessible online the film work of JoAnn Elam, but as can be the case, that has sometimes turned out easier said than done. Recently, we found a curious reel labeled “Filmabuse (Original)” that presented a challenge for digitizing and required altering our previously established workflow. This uncut double-8mm reel appeared to be an element of a previously digitized (and already streaming) film, “Filmabuse” (circa 1975), an abstract 16mm film that was likely printed from originally hand-painted film. Although probably not the original hand-painted film itself, “Filmabuse (Original)” appeared to be an element that “Filmabuse” was printed from. From what we can determine, the same footage from “Filmabuse (Original)” is repeated four times on “Filmabuse,” each time with variation in direction and orientation. What was initially striking was how vivid the colors of “Filmabuse (Original)” were when compared to “Filmabuse.” Not only was some vibrancy likely lost in the initial printing, but, due to the color process used to make the print, the color of “Filmabuse” has faded over the years.
“Filmabuse (Original)” – Double 8mm
“Filmabuse” – 16mm
We were excited to digitize and share this unique object, both because of the context it adds to the finished film and because of how beautiful it is on its own. But digitizing the film presented certain challenges, not least because of its odd film gauge. When unexposed, double 8mm (AKA Regular 8mm) is the same width as 16mm, only with twice as many sprocket holes (perforations) on each side. As the film runs through the camera, it first exposes only one half of the film’s width. When the length has been exposed, the camera operator reloads the same film into the camera a second time, now oriented so the other half is exposed. The film developer typically then slits the film in half along its length and attaches the two ends, resulting in a full reel of developed film that is 8mm wide.
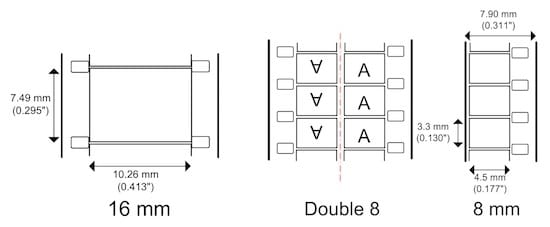
Comparison of 16mm and 8mm
This is a typical consumer’s experience with double 8mm, but some artists (like JoAnn Elam) have experimented with using double 8mm in its uncut form as another format for filmmaking. Uncut double 8mm has twice as many perforations as 16mm, but the additional holes are simply inserted in between those normally on 16mm. This means a double-8mm film can usually be treated with the same equipment as 16mm, and every other hole will just be ignored by the 16mm-spaced sprocket teeth. This helps explain why the printed film “Filmabuse” is 16mm instead of double 8mm: the printing process is easy and the finished film could be screened in any venue with 16mm projection.
We would normally be able to treat “Filmabuse (Original)” like any other 16mm film we’ve digitized from JoAnn Elam, but in this case, the film had damage to its perforations and edges and was severely warped. This made transfer with our Tobin Telecine, the machine we use for the bulk of our digitization, very risky. The Tobin is essentially a film projector with a digital camera which captures a video of the film as it travels through the gate. Both the Tobin and a projector use sprockets to pull the film by its perforations through the machinery, so if a film is too damaged to run through a projector, like “Filmabuse (Original)” was, it shouldn’t be run through the Tobin either. Therefore, we decided it was an ideal candidate for scanning using our Kinetta Archival Film Scanner. Unlike a Tobin or film projector, the Kinetta is sprocket-less. It uses rollers instead and is much gentler to damaged films. However, the set-up and production process of a Kinetta scan is much greater than the Tobin—as is the final file size—which is why we typically use the latter when digitizing for access.
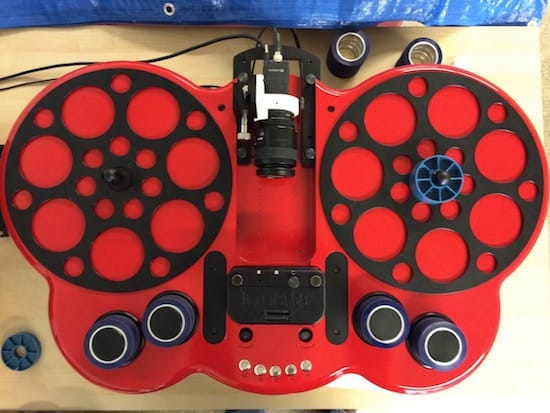
Kinetta Archival Film Scanner
This was our first time scanning double 8mm. Because it lacks sprockets, the Kinetta relies on a sensor that detects every perforation in order to stabilize the image. We set what gauge the scanner is working with, and it knows to look for the correct number of perforations and their spacing per frame for that gauge. Because the print of “Filmabuse” is 16mm and the double 8mm version presumably matched that framing (and requires the use of a gate 16-mm wide anyway), we first set the Kinetta to read 16mm perforations. This caused a problem, though, for the stabilization software was getting flustered each time it recognized the additional holes in the double 8mm film. When we set the software to stabilize based on 8mm, we were able to get a stable scan because the software knew to look for perforations with the correct frequency.
There was, however, a downside to scanning as 8mm. Both 16mm and 8mm normally have one perforation per film frame. In the frame-by-frame capture of the Kinetta, this means that for each perforation (and therefore, for each film frame) a corresponding digital frame is created. But because 8mm is intended to be cut to half the size of 16mm, when treating double 8mm like 16mm there are actually two perforations for every “full” frame. As a result, in the raw scan, for every film frame an additional “half” frame was created in between the full ones.
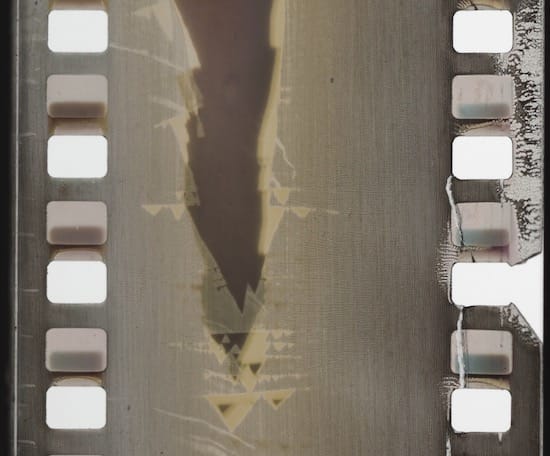
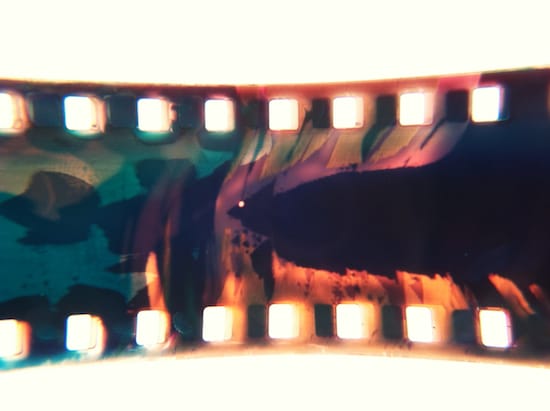
Raw “Filmabuse (Original)” scan
The question then became how to remove these “half” frames to create a file that plays back properly using the full frames of 16mm. It helped to think of the frames in terms of numerical value: frame 1, frame 2, frame 3, etc. That way we could consider the frames as two groups: evens and the odds. Depending which frame in the scan we designated the “first” one, this meant the “half” frames would fall on either every even frame or every odd one. The final file we wanted would then be one that removed every other frame and included only either the evens or the odds that make up the “full” frames.
We decided the quickest way to remove frames was to use the command-line video-editing tool FFmpeg. Manipulating frames in this way requires first converting the digital information of the video file into a raw bitstream. The following line of code does that, taking an .mp4 file and transcoding it to a raw YUV stream.
ffmpeg -i input.mp4 -an -vcodec rawvideo -pix_fmt yuv420p rawbitstream.yuv
From there, FFmpeg can be directed to select only odd or even frames from the video and create a new bitstream using only one or the other.
ffmpeg -r 2 -s 2880x2160 -i rawbitstream.yuv -filter:v select="mod(n-1,2)" -c:v rawvideo -r 1 -format rawvideo -pix_fmt yuv420p -an odd.yuv
ffmpeg -r 2 -s 2880x2160 -i rawbitstream.yuv -filter:v select="not(mod(n-1,2))" -c:v rawvideo -r 1 -format rawvideo -pix_fmt yuv420p -an even.yuv
Finally, the bitstream is converted into ProRes for minimal compression.
ffmpeg -f rawvideo -vcodec rawvideo -s 2880x2160 -r 24 -pix_fmt yuv420p -i even.yuv -c:v prores -profile:v 3 output_even.mov
However, before we could go about removing frames, it became necessary to figure out which frame we actually wanted to consider the first of the film. That way we would know whether to remove evens or odds. What made this extra tricky was that there were no clear markers distinguishing one frame from another. On exposed film, a solid line normally separates the end of one frame from the beginning of the next. But since this film was originally painted instead of photographed, the color from the paint flows freely along the film strip. It makes it difficult to think in terms of frames when the reel has an appearance akin to color flowing across a scroll. Again, thinking of “Filmabuse” as 16mm, the way we chose to consider “Filmabuse (Original)” was: what sections would be a frame if the reel ran through a 16mm projector? Since splices typically do not cleave directly into frames, we considered the top of the first frame to be right at the first splice where the head leader is attached to the film.
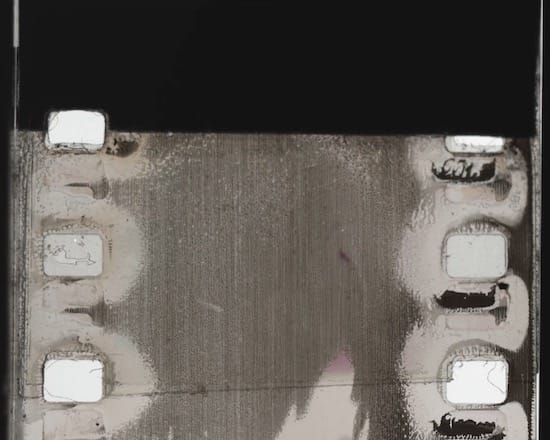
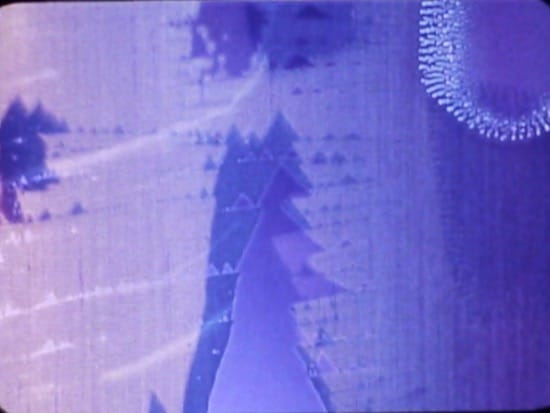
The first splice of “Filmabuse (Original),” indicating the likely first frame
This gave us our starting point, and it turned out that every “half” frame corresponded to an odd frame in our count, meaning we wanted a file that included only even frames. Using the FFmpeg commands, we created a new file of “Filmabuse (Original),” confirmed to correspond to the 16mm playback of “Filmabuse.” This file and the full master now reside in our digital collection storage, and a version will be made accessible online soon. The film itself resides safely in our vault.
****
The authors are indebted to the contributors to StackExchange and the AMIA Open Source Committee’s ffmprovisr project, without both of which FFmpeg could not have been implemented into this project.
![[Rudy Lozano]](https://www.chicagofilmarchives.org/wp-content/uploads/2023/08/Lozano2.png)